To build a network infrastructure we opened the Coolterm application. The following is our output from Coolterm:
login : admin
password : switch
Welcome to the Alcatel OmniSwitch 6000
Software Version 5.4.1.322.R01 Service Release, February 07, 2007.
Copyright(c), 1994-2005 Alcatel Internetworking, Inc. All Rights reserved.
OmniSwitch(TM) is a trademark of Alcatel Internetworking, Inc. registered
in the United States Patent and Trademark Office.
To confirm Vlan 2 was configured we typed the command:
-> show ip interface. We knew it was not because it was not listed (see Figure 1)
Total 2 interfaces
Name IP Address Subnet Mask Status Forward Device
--------------------+---------------+---------------+------+-------+--------
Loopback 127.0.0.1 255.0.0.0 UP NO Loopback
vlan-1 192.168.25.254 255.255.255.0 UP YES vlan 1
Figure 1
To connect using Telnet and Webview we typed the command:
-> aaa authenticaion default local
This allowed Internet connection to the switch.
These commands created and configured Vlan2:
-> vlan 2
-> ip interface vlan-2 address 10.0.25.254 mask 255.255.0.0 vlan 2
-> ip static-route 0.0.0.0 mask 0.0.0.0 gateway 10.0.1.254
->vlan 2 port default 8/1
These commands made the changes permanent:
-> write memory
The terminal console displayed:
File /flash/working/boot.cfg replaced.
This file may be overwritten if "takeover" is executed before "certify"
-> copy working certified
The terminal console displayed:
WED JUL 06 09:31:28 : CSM-CHASSIS (103) info message:
+++ CERTIFYing software process started
+++ Setting CERTIFY Timeout for 404 seconds
Copying boot.cfg .................... completed
->
WED JUL 06 09:31:29 : CSM-CHASSIS (103) info message:
+++ CERTIFY process completed successfully
Connection Testing
In Coolterm we typed: ping 10.1.0.254 and it was able to connect to the main switch.
We configured the IP address on my Mac (see Figure 2)
-> show ip interface. We knew it was not because it was not listed (see Figure 1)
Total 2 interfaces
Name IP Address Subnet Mask Status Forward Device
--------------------+---------------+---------------+------+-------+--------
Loopback 127.0.0.1 255.0.0.0 UP NO Loopback
vlan-1 192.168.25.254 255.255.255.0 UP YES vlan 1
Figure 1
To connect using Telnet and Webview we typed the command:
-> aaa authenticaion default local
This allowed Internet connection to the switch.
These commands created and configured Vlan2:
-> vlan 2
-> ip interface vlan-2 address 10.0.25.254 mask 255.255.0.0 vlan 2
-> ip static-route 0.0.0.0 mask 0.0.0.0 gateway 10.0.1.254
->vlan 2 port default 8/1
These commands made the changes permanent:
-> write memory
The terminal console displayed:
File /flash/working/boot.cfg replaced.
This file may be overwritten if "takeover" is executed before "certify"
-> copy working certified
The terminal console displayed:
WED JUL 06 09:31:28 : CSM-CHASSIS (103) info message:
+++ CERTIFYing software process started
+++ Setting CERTIFY Timeout for 404 seconds
Copying boot.cfg .................... completed
->
WED JUL 06 09:31:29 : CSM-CHASSIS (103) info message:
+++ CERTIFY process completed successfully
Connection Testing
In Coolterm we typed: ping 10.1.0.254 and it was able to connect to the main switch.
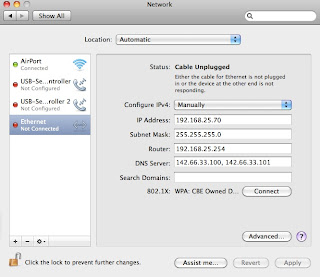
We configured the IP address on my Mac (see Figure 2)

Figure 2
Once this was configured, we used the command: ping 192.168.25.254 to confirm connection with the Vlan 1.
Next we used the command ping: 10.0.25.254 to confirm the connection with the Vlan 2.
Finding the Hardware Specifications:
It was interesting to have a look inside the computer in order to identify the various hardware specifications. To find specific information we identified the part model numbers and searched within Google.
To identify the steps to install Windows Server 2008, we referred to the online documentation that we found for assignment 2b. Using online resources (i.e. those found in blogs, forums and RSS feeds) is very beneficial when installing software and for problem solving!
The following information describes how we installed the Windows Server 2008:
- Start computer
- F12 at splash screen (when computer is booting up)
- inserted Windows Server 2008 dvd
- selected boot from CD drive
- pressed a key to enter set-up
At the first prompt:
- Language to install: English
- Time and currency Format: English (Canada)
- Keyboard or input ethod: US
- Click next
At the next prompt:
- Click install now
At the next prompt:
- select Windows Server 2008 Standard (Full Installation) X86
- select I accept the license terms
- Click next
- select Custom (advanced)
- select Driver Options (advanced)
- delete each partition
- select the first one, click delete, ok
- select the second one, click delete, ok
- To create a partition, click on new
- Leave size with default settings, apply
- To format the partition click format, ok
- click next to install Windows Server on the partition
Server rebooted a number of times
Prompt came up The user’s password must be changed before logging on the first time.
-click ok
set password to admin5769, retype password
-click confirm
-click ok
Once server boots, complete initial configuration tasks (loads by itself)
-Set time zone mountain, click ok, click ok
-configure networking
right click local area connection, properties, double click internet protocol version 4
IP Address 192.168.25.50
sn mask 255.255.255.0
gateway 192.168.25.254
primary dns server 142.66.33.100
secondary dns server 142.66.33.101
click ok, click ok
close network connections
Prompt came up, select work network, click close
-provide computer name and domain
click change
computer name: SCserver2008
click ok, click ok, click close, click restart now
(computer reboots)
log on
-provide computer name and domain
click change
workgroup: network5769
click ok, close, ok, close, restart now
(computer reboots)
log on
close intial configuration task
click start, right click on my comuter, click properties, click change activation key
enter key, click next, click ask me later
click start, give reason for shutting down.
My favorite part about today was identifying the functions and capabilities of various components and devices; this task was interesting and informative.
I am looking forward to our work tomorrow.
A Helpful Tool
Below is a link to a subnet calculator that my partner found. This beneficial tool can be used to determine valid network IP addresses for given subnet masks.

References For Online Documentation
Computerwis. (2010, August 1). Re: How to install windows server 2008 [Online forum comment]. Retrieved from http://www.raymond.cc/forum/tutorials/21901-how-to-install-windows-server-2008-a.html
Hoffman, B. (2008, March 3). Windows server 2008 install walkthrough [Web log post]. Retrieved from http://windowsis.com/blogs/windowsis/archive/2008/03/03/windows-server-2008-install-walkthrough.aspx
Microsoft. (2011). Windows Server 2008 System Requirements. Retrieved July 6, 2011, from http://msdn.microsoft.com/en-us/windowsserver/cc196364
Petri, D. (2009). How to install windows server 2008 step by step. Retrieved July 6, 2011, from http://www.petri.co.il/how-to-install-windows-server-2008-step-by-step.htm
Warren, S. (2008, April 15). How do I install and configure a DNS server in windows server 2008 [Web log post]. Retrieved July 6, 2011, from http://www.techrepublic.com/blog/datacenter/how-do-i-install-and-configure-a-dns-server-in-windows-server-2008/327
Windows Reference. (2008). How to set up DHCP server in windows server 2008 step by step guide. Retrieved July 6, 2011, from http://www.windowsreference.com/windows-server-2008/how-to-setup-dhcp-server-in-windows-server-2008-step-by-step-guide/


No comments:
Post a Comment